Drafting a balanced skirt block – part 3

In part 2 of the Balanced Skirt Block series we transferred measurements onto paper in form of a grid, worked out and marked dart widths for front and back panels.

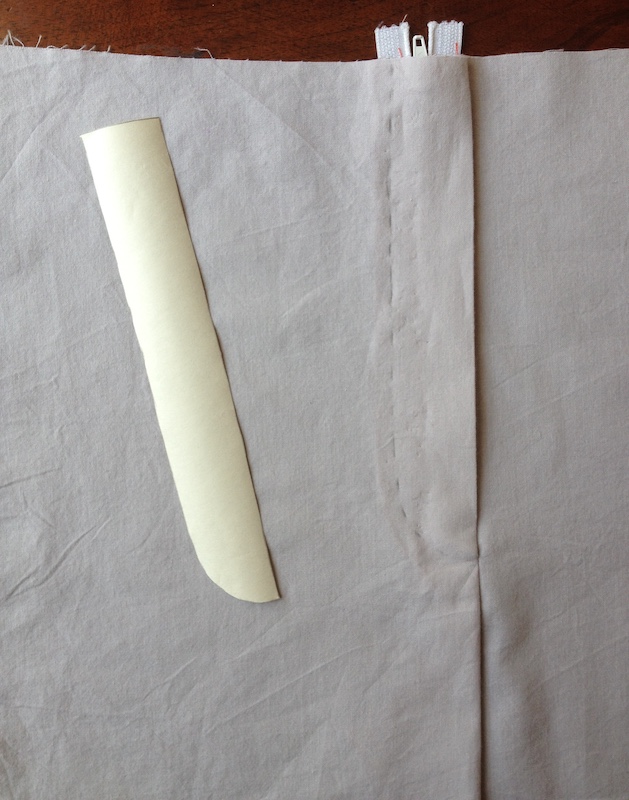
At the moment our dart leg and centre points are connected with straight lines and need to be shaped into curves that follow those of our body. Curves are tricky to measure and are best observed directly in the mirror or in photo references. It is a good idea to approach this task with the artist’s eye, seeking out lines, shapes and spaces in what you see. I will demonstrate on the back dart as it can have a wide variety of shapes but the same logic applies to the side and the front ones. Take a side view photo of yourself and look at the curve connecting the back waist and the most protruding buttock point. Does it go straight down then curves gently as in picture 1? Or it it closer to picture 3 and has more of a rounded shape to it? I’m personally similar to the first one.

The guideline is this: if the back curve goes straight down then it will do the same on that section of the dart; where it curves outwards the dart legs will curve inwards:

Poor dart shaping can upset the hang of an otherwise well-fitted garment so taking a moment to analyze your contours is a good investment of your time. Next time I’ll show a hands-on way of shaping the waist curve, then the block is completed.

Remember, a solid understanding of the skirt will help achieve a good fit on trousers too. I plan to write a separate series on trouser drafting and fitting. If this is of interest, you can sign up to receive new post notifications via mail on this page.

Drafting a balanced skirt block – part 2

In this post we’ll transfer our measurements onto paper, work out and mark the darts.

I will be drafting one half of the skirt but if you have an asymmetric figure then draft both sides.

Take a sheet of paper that is as wide as half shell circumference and as long as waist to hip + hip to knee at side length. Add a margin of about 10cm (4″) all around. Step-by-step instructions below:

1) step away the width of the margin from top and left side and mark point A; 2) draw a vertical line from A to B equal to hip level from waist measurement; 3) draw a vertical line from B to C equal to hem level from hip measurement; 4) draw a horizontal line from B to D equal to half shell circumference measurement; 5) square up from point D and to the right from point A until they intersect in point F; 6) square down from point D and to the right from point C until they intersect in point E.

A to C = centre front; F to E = centre back; B to D = hip level.

Now you can either use the wide paper “wrap” that you measured the shell circumference with and trace from it or measure it first then transfer results to the block with a ruler. I’ll show the first method. On the “wrap” mark centre lines in the middle of the front and back widths. For a symmetrical figure you only need the middle section so the grayed out areas to either side of it can be cut off.

7) place this template on top of your draft alining the hip mark with the hip level. Transfer the side seam line, stomach and buttock level marks from the template onto the draft; 8) remove the template and extend the side seam line to waist and hem, mark points G, H and I at intersection with the hip line; 9) extend the stomach level line to the side seam and mark points J and K; 10) extend the buttock level line to the side seam and mark points L and M; 11) label the front and back panels.

Consider your skirt grid completed. The correctly proportionate to your body front and back panels define your horizontal balance. We’ll address the vertical balance in the following posts.

The next step is to work out the dart widths. I personally use the model’s photo references to arrive at exact front, back and side dart values. As my graphic drafting method is not covered in this series I offer you an alternative:

Sum darts at front equals front panel width (line J-K) minus a quarter of waist circumference.

Sum darts at back equals back panel width (line L-M) minus a quarter of waist circumference.

In my example J-K = 25cm (10″), L-M = 27cm (10 1/2″), a quarter of waist circumference = 19cm (7 1/2″). Sum darts at front = 25cm (10″) – 19cm (7 1/2″) = 6cm (2 1/2″). Sum darts at back = 27cm (10 1/2″) – 19cm (7 1/2″) = 8cm (3″). In my example I arrived at 6cm (2 1/2″) for front panel and 8cm (3″) for back panel darts. They need to be further split into centre and side dart.

I’m not a fan of using arbitrary approximative numbers in pattern making but for now I also want to keep things simple. We’ll have plenty of opportunity do go advanced later. I suggest you assign 4cm (1 1/2″) or less to the side dart on both back and front and use the rest for the center darts. The reason for it is that the larger is the dart the more pronounced is its centre point on fabric and the more difficult if becomes to achieve a smooth curve. Think of a cone shape, after all it’s just a circle with a dart. The more “hourglass” is your figure the more pronounced the side dart will be. Start with the maximum 4cm (1 1/2″). The opposite goes for a “column”-like shape.

With this in mind:

Centre front panel dart is equal to total front darts minus 4cm (1 1/2″) or less.

Centre back panel dart is equal to total back darts 4cm (1 1/2″) or less.

In my example front dart = 6cm (2 1/2″) – 4cm (1 1/2″) = 2cm (1″); back dart = 8cm (3″) – 4cm (1 1/2″) = 4cm (1 1/2″).

12) divide line A-G in half and mark point N; 13) drop a vertical line to J-K and mark point O where the lines meet; 14) divide line F-G in half and mark point P; 15) drop a vertical line to L-M and mark point Q where the lines meet; 16) step off your chosen side dart width to either side of G and mark points R & S; 17) step off half front dart width to either side of N and mark points T & U; 18) step off half back dart width to either side of P and mark points V & W; connect points TOU, RIS, WOV with a fine line. We’ll take care of smooth shaping in the next post.

Drafting a balanced skirt block – part 1

This is a follow up on Balanced waist darts made for you and also part 1 of the skirt block drafting series.

How did you get on with the little exercise in my yesterday’s post? The answer is that the purple skirt on the left has darts equal to the difference between waist and hip circumferences but the one on the right not. The following series of posts will throw light on this difference and the implications it has on fit.

Today I’ll start showing you my way of drafting a skirt block. Conventional drafting methods do not consider your particular balance and proportions as they cater for a “standard” figure. Also, they can be vague. Take the skirt. Which one of these is the basic block? The hip-hugging or the looser one?

Let’s adopt unambiguous terminology and come up with a definition. In my method a basic skirt block is the one on the right above and can be described as follows:

a tubular shape garment anchored horizontally around the waist with circumference at hem equal to the measurement “shell circumference“;

Think you can see now that the skirt on the left doesn’t match this description and so I would consider it a slim-fitting style derived from the basic block.

With the definition out of the way, let’s take necessary measurements. List of tools:

  • measuring tape
  • non-stretch ribbon/string long enough to wrap around the waist + to tie a bow knot
  • 2 of above ribbon/string or strips of paper about 30cm (12″) long
  • strip of paper wide about 30cm (12″) and long enough to wrap around your hips + about 13cm (5″). Any paper roll will do, for example baking paper
  • pins
  • something to draw with – marker pen, pencil, pen…
  • full-length mirror

Put on some close-fitting clothes like leggings and a t-shirt. They shouldn’t compress the body unless this is what you plan to wear normally under your skirt. Measure your waist circumference at the slimmest part of your torso or at the elbow level holding the measure tape horizontally to the floor. Divide this measurement in 4 and mark it on your string so you have 5 marks like so:

Wrap it around your waist and align points 2&4 with your centre back and centre front. Tie at points 1a&1b. Points 1a, 1b and 3 now indicate the side seam positions at waist.

Refer to the picture below. 1) pin your ribbons or paper strips from points 1 and 3 at waist down in a vertical line. They divide your body into the front and back sections so these can be measured separately. 2a & 2b) wrap the wide paper strip around your hips so it is perpendicular to the floor all the way around and pin in place. Mark the side seams following the side ribbons. Look in the mirror front-on and mark the most prominent hip level, repeat for stomach and buttocks looking in the mirror side-on. 2b) Measure from waist to hip level at side and straight down from hip to knee, see the green dotted line.

You should now have these four measurements:

  • waist circumference
  • shell circumference
  • hip level from waist and
  • hem level from hip

Unwrap your measuring gadget and keep it for the next step. It will look something like this:

Your back to front proportions, aka as horizontal balance, are probably going to be different, unless you happen to have the same shape as my example. If you are new to the concept of “balance” you might want to read this post. The front and back widths together give you what I call the “shell circumference“. To complete the block you need to work out your vertical balance and add darts. I’ll show you how to to this in the next posts. You can probably already tell me yourself now how to work out the total darts width for this block?

Balanced waist darts made for you

I’ll start off-topic by saying that I have lots of ideas to share here. I’ve attempted planning long detailed articles but that hasn’t worked as they get put away in a long drawer to never see the light of your computer screens. So, one snippet a time, I’ll be posting about the fundamentals of patterns drafting and explaining how you can apply these principles to patterns you make or own. As a result of this series I will release sewing patterns that you will be able to verify and adjust before even making a sample. The aim is to help you reduce the time spent fitting or eliminate it altogether. Check the Testing page if you want to lend your fitting woes for the benefit of research and development.

Back to the balanced waist darts. I love balance! It’s so important to a good fit, probably more so than measurements. I touched on it in this article and you’ll certainly hear from me about it again. So we all know that the sum of darts at waist is just the difference between the hip and waist circumferences. Let’s say your hip circumference is 102cm (40″) and your waist circumference is 76 cm (30″) so all of the darts at waist should sum up to 26cm (10″), or so say the textbooks. Once you’ve worked out this value you divide it in (usually) 6 darts: 2 at front, 2 at back an 1 at each side seam. If you follow pattern making instructions they will provide you with a formula for this division. A common assumption is that your back darts are larger than the front ones which, of course, is not necessarily true as we are all different.

Consider this post an introduction to discuss the following points:

  1. drafting darts that respect your uniquely beautiful curves is possible
  2. darts are not always = hip circumference – waist circumference

Take a look at the illustrations below and try to understand in which one the darts can be worked out by taking the waist circumference away from the hip circumference and in which this won’t work.

I’ll leave you to ponder and comment on this and will post the answer tomorrow! This little exercise will let me introduce you to the “shell” concept and I hope it gets you thinking out of the box about sewing patterns.

Anastasia

Sewing a fly front zipper

If you’ve ever had the problem of fly gaping then read to the end.

In the previous post I shared my way of drafting a zip fly fastening, here I’ll show you the way I assemble it. I suggest you do a sample before using it in your sewing project. If you are making men’s trousers the right panel will become the left one and vice versa. In the photo descriptions, when I say “left” I refer to left side as for the wearer, idem for “right”.

First, apply a light fusible interfacing as shown.

11_fuse_details_2 copy 6

Neaten the fabric edges of the trouser panels, place with right fabric sides together and sew the centre seam to the drill hole on the right panel.

sew_centre_seam_right_panel
wrong fabric side of right trouser panel
sew_centre_seam_left_trouser_panel
wrong fabric side of left trouser panel

Fold the facing on right panel and the seam allowance on left panel along the line connecting notch and drill hole and press.

3.press_seam_allowances

Turn the fabric right side up and place the zipper under the left side panel with the zipper teeth along the fold. Pin in place and stitch. ***Note that my sample has no seam allowance at waist. In a garment the zipper tape will be covered by fabric at the top.

4.sew_zipper_to_left_side
zipper attached to left side panel
zipper_sewn_to_left_side_fabric_outside_view
zipper hidden by right side panel
zipper_sewn_to_left_side_fabric_inside_view
inside view

Pin the zipper tape to the facing at a slight angle so it’s closer to the facing edge at waist. This is a trick of the trade that helps the fly stay flat, see demo at the end of the post.

7.pin_zipper_to_right_side_slant.jpg

Stitch in place to the facing only close to the zipper teeth.

8.stitch_to_right_side.jpg
stitch_to_right_side_inside_view
zipper tape stitched to facing

On the right fabric side of the right panel mark the topstitching line. I find it helps to trace off the shape from the pattern and outline it with chalk/washable marker.

11.mark_topstitching_with_template.jpg

Topstitch. Reinforce the stitching with a bar tack at the bottom of the topstitching line.

12.topstitch.jpg

Grab your zip guard and neaten the edges. (You are continuing to see the same fabric but my phone camera obviously decided to “see it in a new light” and tinted it blue.)

14.take_fly_guard.jpg

Pin to the zipper tape and seam allowance only, not through the trouser panel.

15.pin_fly_guard_to_zip_and_sa.jpg

Stitch in place. I’m sure you’ll do a better job of it than I did in this photo.

16.stitch_zip_guard_in_place.jpg

Now you just need to fix the zip guard so it stays in place. Pin it to the seam allowance, optionally mark a stitch line then sew taking care to not catch the actual trouser panel.

Final result:

19.zip_fly_finished.jpg

And now a little bonus for those who have made it all the way to the end of the article.  I did a couple of photos that show the difference between sewing the zipper parallel to the facing edge as opposed to at a slight angle. Well, I pinned and taped not sewed but you can still see the difference. It helps the fly stay nice and flat on tight fitting trousers.

1. zipper attached parallel, fly is gaping. A common defect in diy jeans.

2. zipper closer to facing edge at waist, fly is flat.

Try looking at some store-bought trousers to see if you can spot it. A couple of examples from my wardrobe:

Hope you find this useful, do let me know in the comments how you get on.

Anastasia

P.S.: I know, I know… I will work on photography. Right now I’m in a battle against perfectionism and have adopted the motto “done is better than perfect”. Bear with me.